Teacher Cut Files: How SVG, PNG, EPS, and DXF Designs Make Back-to-School Creative and Easy
Every teacher knows that the weeks leading up to back-to-school season are a whirlwind of lesson planning, classroom setup, and endless to-do lists. Amid the chaos, one trend has quietly transformed how educators prepare their learning spaces: digital cut files. Whether you have a Cricut, Silhouette, or another cutting machine—or you simply love printable designs—teacher-themed cut files like the popular "Wake Up, Teach Kids, Be Awesome" set have become a go-to resource for creating custom classroom decor, organizers, and gifts. In this article, we’ll explore what cut files are, why they matter for modern education, and how you can use them to make your classroom both functional and inspiring.
What Exactly Are Cut Files?
A cut file is a digital design used by cutting machines to precisely slice materials like paper, vinyl, cardstock, or fabric. Think of it as a template that tells your machine exactly where to cut. Unlike a simple image, a cut file contains vector paths—mathematical lines and curves—that allow the cutter to follow the outline of the design. These files come in several formats, each suited for different software and machines.
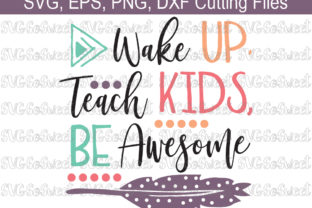
For teachers, cut files are a game-changer because they turn a computer design into a physical object you can stick on a wall, label a bin, or wear on a shirt. The "Teacher Wake Up Teach Kids Be Awesome" collection, for example, bundles four common formats into a single .zip file: SVG, PNG Transparent, EPS, and DXF. Having all four ensures that whether you use a Cricut, a Silhouette, or even just a home printer, you can open and use the design right away.
Breaking Down the Four Formats
Understanding the differences between these formats helps you choose the right tool for each project. Here’s a simple breakdown:
SVG (Scalable Vector Graphics)
SVG is the most widely supported vector format for cutting machines. It stores the design as code that describes shapes and lines, so it can be scaled to any size without losing quality. If you own a Cricut (using Cricut Design Space) or a Silhouette (using Silhouette Studio), SVG is often your best bet. You can upload it directly, resize it, and send it to cut. The "Be Awesome" SVG file, for instance, can be enlarged to fit a large classroom banner or shrunk to adorn a name tag—all with perfect sharpness.
PNG Transparent
PNG is a raster (pixel-based) image, but with one huge advantage: a transparent background. This means you can place the design over any color without a white box around it. While you can’t cut PNGs with a cutting machine directly (unless you convert them), they are perfect for printing. Teachers often use the PNG version to create stickers, laminate them for desk labels, or even project the image onto a smartboard for a coloring activity. The transparent background makes it blend seamlessly into any classroom decor.
EPS (Encapsulated PostScript)
EPS is an older but still widely used vector format. It’s especially popular with professional graphic designers and older versions of software like Adobe Illustrator. If your school’s design program uses EPS files, you can open, edit, and resize the "Wake Up Teach Kids" design without losing quality. Many cutting machines also accept EPS, though sometimes you need to convert it to SVG first. For teachers collaborating with a school’s media center or a parent who designs professionally, EPS offers flexibility.
DXF (Drawing Exchange Format)
DXF was originally created by Autodesk for CAD software, but it’s become a standard for cutting machines—especially older Silhouette models. If you use Silhouette Studio Basic Edition (the free version), DXF files are often easier to open than SVG. The DXF format retains the vector paths, so you can scale and cut just like with SVG. Having it included means no teacher is left out, regardless of which machine or software version they use.
Why Teachers Love Cut Files for Back-to-School
Back-to-school season is about more than fresh pencils and new notebooks—it’s about creating an environment where students feel welcome, organized, and motivated. Teacher cut files deliver on all three fronts. Let’s look at some practical ways educators use them.
Classroom Decor That Inspires
A "Teacher Wake Up Teach Kids Be Awesome" vinyl decal on your classroom door sets a positive tone before students even walk in. Cut from adhesive vinyl, the design can be applied to walls, windows, desks, or even a laptop lid. Because the file is scalable, you can create everything from a tiny affirmation on a pencil holder to a giant mural across a bulletin board. The message is simple but powerful—it reminds both teacher and students that every day is an opportunity to be awesome.
Organized Spaces with Custom Labels
Using the PNG or SVG version, you can print and cut labels for bins, cubbies, supply drawers, and reading nooks. For example, a "Be Awesome" tag on a book bin subtly reinforces classroom culture. With the transparent PNG, you can print onto sticker paper, cut around the design, and stick the label anywhere. If you have a cutting machine, you can use the SVG or DXF to cut directly from adhesive-backed paper, creating perfectly round or shaped labels every time.
Bulletin Boards That Pop
Bulletin boards are a cornerstone of classroom communication. Instead of buying pre-made letters and decorations, teachers can use the EPS or SVG file to cut large letters and shapes from colored cardstock or vinyl. The "Wake Up Teach Kids" design can serve as the central headline, with student artwork surrounding it. Because the file is editable, you can resize individual elements—make the word "Awesome" extra large, or stretch the phrase to fit a narrow board.
Gifts and Teacher Appreciation
Back-to-school isn’t just for students. Teacher appreciation gifts, team shirts, and welcome packages for new staff members all benefit from customized cut files. The DXF or SVG can be used to create iron-on transfers for tote bags, coffee mugs, or t-shirts. Imagine a staff team wearing "Teach Kids Be Awesome" shirts on the first day—it builds camaraderie and sets a shared mission.
How Cut Files Fit Into Modern Education and Creativity
The rise of cut file crafting reflects a broader shift toward personalized, hands-on learning in education. Teachers are no longer just consumers of mass-produced classroom decor—they are creators. Using digital files, they can tailor every visual element to their specific classroom theme, curriculum, or student needs.
Moreover, cut files introduce students to design technology. Many teachers use their cutting machines to create math manipulatives, letter-matching games, or history timeline cards. By showing students how a design on screen becomes a physical object, teachers demystify the design-to-manufacturing process. This aligns with STEM and STEAM education goals, blending art with technology.
Cut files also support differentiation. A single SVG file can be resized to create large-print labels for visually impaired students, or simplified shapes for younger learners. The versatility means one download can serve multiple purposes across grade levels.
Clear Up Common Misunderstandings
If you’re new to cut files, a few misconceptions might hold you back. Let’s set the record straight.
- Misunderstanding: "I need expensive software to use these files."
Not true. Free versions of Cricut Design Space, Silhouette Studio, and even free vector editors like Inkscape can open SVG and DXF files. PNG files can be opened by any basic image viewer or editing program. - Misunderstanding: "The files are only for people who own cutting machines."
While SVG, EPS, and DXF are designed for cutters, the PNG file is a standard image anyone can print. If you don’t own a cutting machine, you can still print the design on sticker paper, cardstock, or iron-on transfer paper and cut it by hand with scissors. - Misunderstanding: "All four files are identical."
Each format serves a different purpose. The .zip file contains all four so that you can use the design across various platforms without needing conversion software. It’s not redundancy—it’s convenience. - Misunderstanding: "Cut files are too complicated for a beginner."
Most modern cutting machines guide you step-by-step. Opening an SVG in Cricut Design Space, for example, takes only a few clicks. Thousands of teachers start with zero design experience and become confident users within a week.
Practical Tips for Getting Started
Ready to use your "Teacher Wake Up Teach Kids Be Awesome" cut files? Here’s a step-by-step approach:
- Download and unzip the .zip file to a folder on your computer. You’ll see four separate files with the extensions .svg, .png, .eps, and .dxf.
- For cutting machines: Open your cutting software (e.g., Cricut Design Space). Click "Upload" and choose the SVG file (or DXF if your software prefers it). Resize as needed, then send it to cut.
- For printing: Open the PNG file in any image program (like Microsoft Word, Canva, or Photoshop). Insert it into a document, resize, and print onto sticker paper, cardstock, or transfer paper.
- For editing: If you need to change colors, add text, or combine with other designs, use the EPS file in a vector editor like Adobe Illustrator or the free Inkscape.
- Test first: Always do a small test cut on scrap material. Adjust blade depth and pressure based on your material—cardstock needs different settings than vinyl.
Conclusion
Teacher cut files like the "Wake Up Teach Kids Be Awesome" set are far more than digital clutter—they are a practical, creative, and time-saving resource for modern educators. By bundling SVG, PNG, EPS, and DXF formats in a single .zip file, designers ensure that every teacher, regardless of their tech setup, can bring the design to life. Whether you decorate a classroom, organize supplies, or inspire your students with a positive message, cut files put the power of custom creation in your hands.
As back-to-school season approaches, consider how a few simple cuts can transform your learning environment. With the right files, a cutting machine, or just a printer and scissors, you can make your classroom a place where both you and your students feel ready to wake up, teach kids, and be awesome every single day.